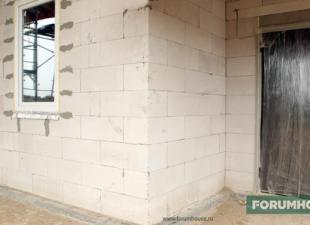
Aerated concrete is a universal material that is successfully used in low-rise construction for the construction of load-bearing walls and supporting structures, as a heat-insulating material for insulating brick and monolithic structures. However, it also has a number of features. To build a warm house from this material, exact adherence to technology is required to ensure the durability and strength of the structure. The insulation of a house made of aerated concrete is also subject to a special procedure.
Methods and choice of insulation
Cellular concretes have high vapor permeability, which means that the walls made of aerated concrete actually "breathe", permeable to gas and naturally water vapor. Enclosing structures of residential buildings must comply with the rule of hydroprotection of structures. Starting from the inner surface of the walls and up to the very last outer layer in contact with the external environment, the vapor permeability of materials must decrease.
If the sequence is broken in the outer wall of a residential building and the outer layer of the wall has a lower vapor permeability than the inner one, then moisture will surely begin to accumulate in the thickness of the wall over time, from which any material will collapse.
Indoor air in a living space contains more moisture than outdoor air. This is especially true for the cold season. The partial pressure inside the room increases along with the difference in air temperatures inside and outside, the amount of vapor in the air. Steam penetrates into the thickness of the wall and, if it encounters an obstacle in the form of a less permeable layer, it begins to accumulate, up to condensation.
In addition to the described process, there is also the dew point. A place inside building envelopes where the temperature drops so much that water vapor begins to condense.
Below is a table with the vapor permeability of building materials.
| Material | Vapor permeability coefficient, mg/(m*h*Pa) |
| Concrete | 0,0300 |
| Cement-sand mortar (or plaster) | 0,0900 |
| Cement-sand-lime mortar (or plaster) | 0,0980 |
| Lime-sand mortar with lime (or plaster) | 0,1200 |
| Brick, silicate, masonry | 0,1100 |
| Foam concrete and aerated concrete, density 1000 kg/m3 | 0,1100 |
| Foam concrete and aerated concrete, density 800 kg/m3 | 0,1400 |
| Foam concrete and aerated concrete, density 600 kg/m3 | 0,1700 |
| Foam concrete and aerated concrete, density 400 kg/m3 | 0,2300 |
| Pine, spruce across the grain | 0,0600 |
| Pine, spruce along the grain | 0,3200 |
| Chipboard and fiberboard, 600 kg/m3 | 0,1300 |
| Chipboard and fiberboard, 400 kg/m3 | 0,1900 |
| Drywall | 0,0750 |
| Mineral wool, stone, 180 kg/m3 | 0,3000 |
| Mineral wool, stone, 140-175 kg/m3 | 0,3200 |
| Mineral wool, stone, 40-60 kg/m3 | 0,3500 |
| Mineral wool, stone, 25-50 kg/m3 | 0,3700 |
| Mineral wool, glass, 85-75 kg/m3 | 0,5000 |
| Mineral wool, glass, 60-45 kg/m3 | 0,5100 |
| Mineral wool, glass, 35-30 kg/m3 | 0,5200 |
| Mineral wool, glass, 20 kg/m3 | 0,5300 |
| Mineral wool, glass, 17-15 kg/m3 | 0,5400 |
| Expanded polystyrene extruded (EPPS, XPS) | 0,0050 |
| Expanded polystyrene (foam plastic), plate, density from 10 to 38 kg/m3 | 0,0500 |
| Ecowool cellulose | 0,30- 0,67 |
| polyurethane foam | 0,0500 |
| Polyurea | 0,0002 |
| Ruberoid, glassine | 0 — 0,001 |
| Polyethylene | 0,0000 |
| Glazed ceramic tile (tile) | 0,0000 |
| Clinker tiles | 0,0180 |
The table shows that even a layer of plaster has less vapor permeability, and of the heaters, only mineral wool, ecowool and similar materials that can pass more steam and air through themselves are suitable for insulation from the outside.
When building a house, first of all, the strength and durability of aerated concrete are important, and its main advantages for this are ease of installation and lightness, high speed of building construction, and low load on the foundation. It is desirable to enforce three simple rules:
- Ensure uniform heating of aerated concrete throughout the year, taking into account the average minimum temperature in the climatic zone where the house is located.
- Take out the dew point at the average temperature delta outside and inside, if possible, beyond the limits of the aerated concrete masonry.
- Provide protection of aerated concrete from environmental influences, primarily precipitation.
 It is believed that the insulation of a house made of aerated concrete should be performed if the wall thickness is less than 350 mm. There is also an opinion that when building a house, it is much easier to build a wall of a sufficiently large thickness from aerated concrete itself to ensure proper heat resistance than to use insulation. However, both statements cannot be called objective, they are rather special cases. Remembering that in a house made of aerated concrete, it is primarily a material for supporting and supporting structures, it is undesirable to increase the thickness of the walls.
Summing up the results of a brief review, we can come to logical conclusions:
- Warming is carried out only from the outside in order to shift the dew point to the outer part of the wall.
- As a heater, only materials with a vapor permeability equal to or higher than 0.1700 mg / (m * h * Pa) should be used.
- As an external finish, materials and structures with wind protection and a hydrobarrier are used.
Under these requirements, an insulated ventilated facade is suitable. For walls where the thickness of aerated concrete is sufficient to obtain optimal thermal resistance, only a ventilated facade without insulation is used. Inside the building, it is desirable to use forced ventilation, not forgetting that in this case the dew point is located in the thickness of the masonry.
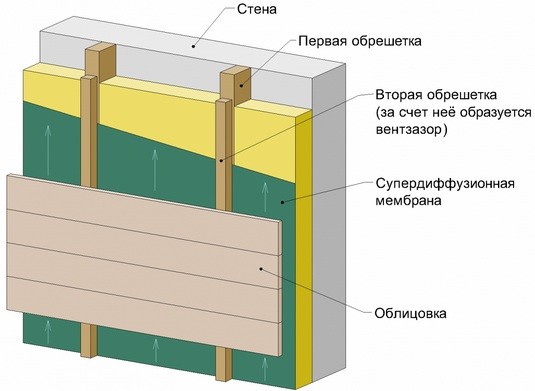
outside wall insulation technology
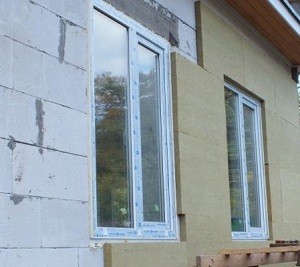
The insulation is attached directly to the wall along the crate or frame. A facade is attached on top of it, or rather siding from any material you like: lining, metal, PVC panels, etc. Between them, a ventilation gap is necessarily formed, which is necessary to remove moisture from the insulation layer and the wall. As a result, the wall is protected from wind and precipitation by siding, and ventilation effectively copes with the drying of the wall. Additionally, a vapor-permeable membrane is attached over the insulation and under the second crate. The sequence of layers in an insulated ventilated facade is as follows:
- The first crate is made of metal or wood.
- The insulation is laid flush with the first crate.
- Layer of wind protection, vapor-permeable membrane.
- The second crate is made of wooden beams or metal profiles.
- Siding, external finishing of a facade.
Consider the option when the battens are formed from a wooden beam.
For this work, you will need a well-dried timber, which will definitely not lead over time. The strength of aerated concrete is not enough, so when the wood is deformed, the entire facade will lead. The wood should lie in a stack under a canopy in a well-ventilated place on the construction site for several months.
The first crate is mounted for the insulation layer, and the depth is the same. If mineral wool 100 mm is selected, then the beam is taken 100x50 mm. It is advisable to choose a timber thickness of 40-50 mm so as not to take up extra space.
Insulation work is carried out after a long drying of the building. The wall before work is cleaned with a brush and a construction vacuum cleaner, after which it is primed. It is better to prime with a spray gun in one pass. It should be borne in mind that aerated concrete is quickly saturated with liquid, so it is important to accurately dose the volume of soil.
A support shelf made of a metal corner is installed along the lower part of the wall to separate the foundation and facade, as well as to form ventilation gaps. So the area with insulation turns out to be elevated above the ground and a foundation with a blind area, enough so that melt and rain water does not soak into it.
The beam of the first crate is fastened vertically with the help of corners on both sides every 50 cm. And to the aerated concrete and to the beam, the corners are attached with 35 mm self-tapping screws, two in each shelf of the corner, preventing them from scrolling. The distance between the bars is 600 mm.
 Warming scheme
 Often the distance is adjusted so that the insulation lies more densely between them. It is enough to measure the distance not along the edges of the timber, but between their middles, if mineral wool is used with a width of exactly 600 mm. If you take mineral wool in rolls 1.2 m wide, then its exact size is 1220 mm, when cut in half, you get 610, just with the right margin for niches 600 mm wide.
Additionally, the insulation is attached to the wall with a dowel-fungus every 50 cm in height and in a checkerboard pattern, two and one fastening horizontally.
The insulation layer must be closed with a wind protection, moreover, a vapor-permeable membrane. A strip of the membrane is rolled out along the wall and fastened evenly without stretch and folds to the crate. Installation is carried out from the bottom up and the material is fastened with staples of the construction stapler. It is not necessary to glue the joints, each new strip is laid with an overlap of 5-7 cm.
Next, the second crate is mounted. It will form a ventilation gap to remove moisture from the insulation and the wall. 40 mm of space is enough for effective air exchange, a bar 30 (40) x40 or 50x50 is used.
The length of the timber is selected equal to a third of the height of the insulated wall. Further, pieces of such length are additionally prepared to complement the long timber, leaving an empty space of 5-10 cm between them, depending on the method of fastening the siding. The bars are distributed in such a way that the gaps between them are distributed in a checkerboard pattern, and are fixed to the crate of the first layer with 75 mm self-tapping screws.
Then it remains only to mount the selected siding using the appropriate technology. It can be metal or plastic panels, lining, etc. Be sure to form ventilation gaps along the lower edge of the insulated wall and along the upper edge under the roof visor.
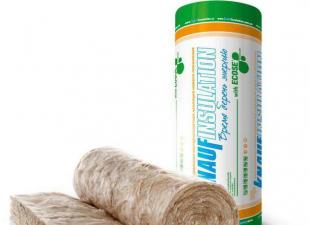
Warming with mineral plates
Instead of soft mineral wool, slabs are also used in rolls. They have high vapor permeability and low thermal conductivity, but at the same time they are stronger and less prone to deformation over time. They can be laid end-to-end and fastened with a dowel-mushroom, for example, like foam or Penoplex.
At the same time, it is advisable to abandon the use of a wooden crate of the first layer. It is easier and better to use "U"-shaped metal fasteners, for example, the same as for a drywall profile. The length of the "wings" of the fasteners should exceed the thickness of the insulation by 40-50 mm.
Fasteners are fixed on the wall with self-tapping screws, preferably two or three, so as not to scroll. It should be distributed along vertical lines spaced 600 mm apart horizontally and every half meter vertically. Just like the beam was installed in the previous example. The distance between the bent wings should correspond to the thickness of the timber for the second level batten.
The insulation is laid end-to-end over the entire area of the wall to be insulated. In places where fasteners are located in the insulation, cuts are made or square pieces are cut out under it. Sheets are put on fasteners and fixed with dowel-fungi. If pieces of insulation are cut out, then all gaps are foamed with mounting foam.
A vapor-permeable membrane is laid in strips along the wall, starting from the bottom to the very top.
After that, it remains to mount the siding and provide for a ventilation outlet. The advantages of this method are obvious - the insulation is laid end-to-end, creating a uniform thermal protection. In addition, the risk of negative consequences due to deformations of the support beam is reduced. Instead of a second-level timber, a metal profile can be used for ventilation. In this case, it is screwed to the “P”-shaped fasteners with galvanized flea screws with a drill tip.